Start with the city and the global map
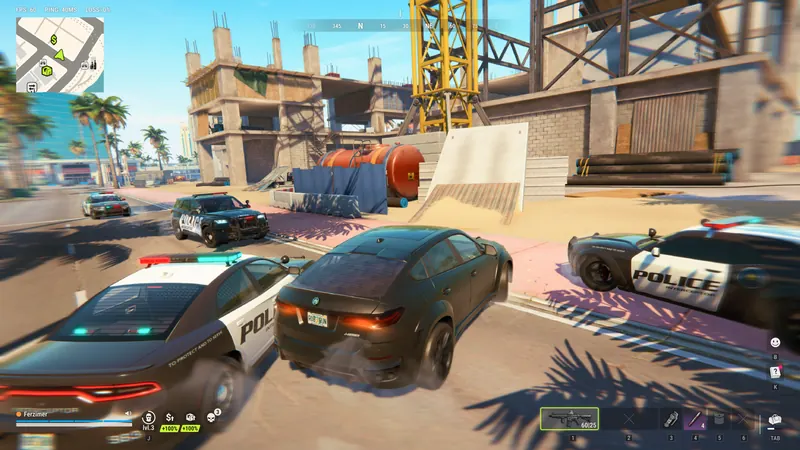
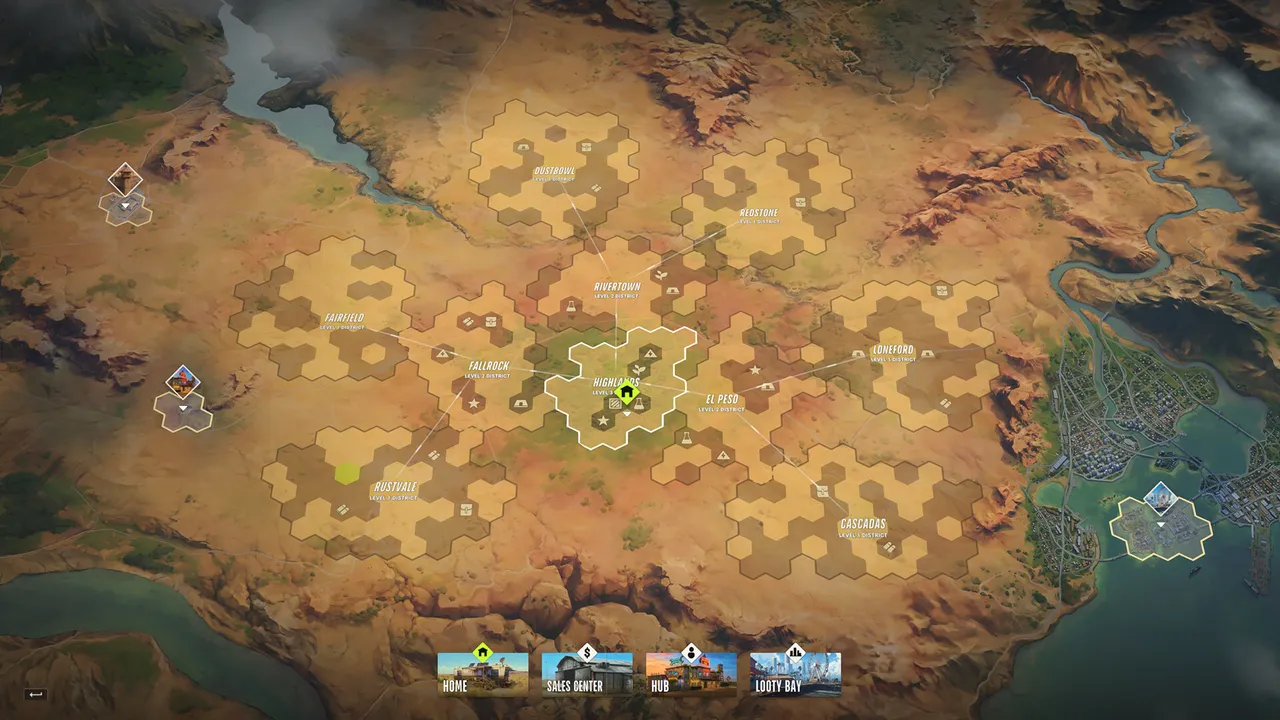
Looty Bay is the city where you plan robberies, sell valuables, visit the bank and join the police. The larger global map connects desert districts, settlements and player bases. The official district image below shows ten named desert districts together with destination shortcuts. Its district names give you a useful orientation reference when choosing a home territory. Current settlement ownership and activity depend on the server you join.
For a first session, learn one selling point, one city exit and the route between them before carrying expensive equipment. Player density changes with the server, time and ongoing encounters. Scout the streets around your target and selling point during your own visit. The beginner hub covers the wider first-session sequence, while the platform guides help you get into the game on your device.
Explore the official district map
Select a district name to read its position in the published artwork. These descriptions refer to the screenshot. Check the live game for ownership, access requirements and current bonuses.
Dustbowl
Dustbowl appears in the upper part of the image, beside the river and above the central districts. When considering a settlement here, inspect the available plot and nearby services in your current server. A name on the global artwork gives orientation, while the in-game settlement panel supplies the information needed to commit resources.
Redstone
Redstone occupies the upper-right part of the desert district network. Compare its journey to the destinations you actually use. A short visual distance on the global artwork is only a starting point for checking your practical travel routine.
Rivertown
Rivertown sits above Highlands near the middle of the map. Use the central cluster to orient yourself when moving between settlements. Before choosing a home, look at ownership and the services available to residents.
Fairfield
Fairfield is on the left side of the named district network. Visit a prospective plot before planning around it. Keep the rent requirements and the money or documents you have available together in your notes.
Fallrock
Fallrock lies between Fairfield and the central Highlands area in the artwork. Review nearby settlement features and the items your territory unlocks. The base plot guide explains the ownership and rental checks in more detail.
Highlands
Highlands is the highlighted central district in this official screenshot. The home icon reflects the captured game state. Your own home location depends on your current character and server, so use your live Home destination when returning with valuable cargo.
El Peso
El Peso appears to the right of Highlands. Inspect the actual hub and settlement options before building a routine around the district. Base choice affects repeated trips, so include travel and selling time when assessing a move.
Rustvale
Rustvale occupies the lower-left portion of the network. Before moving property, compare the features you use most often with the services visible in your destination settlement. Keep enough resources available for the next planned activity.
Cascadas
Cascadas is below El Peso, toward the lower-right of the desert. Plan how you will move goods between home and selling locations. A completed sale is a useful endpoint for measuring a route because inventory value can change before goods become usable money.
Loneford
Loneford is the eastern district beside the visible city coastline. Its position makes the city easy to identify in the artwork. Check the game’s destination controls to travel and inspect the route you intend to use once inside Looty Bay.
Looty Bay locations to recognise
Use the in-game map, building signs and target interactions to locate these activities. A verified street-by-street coordinate list and fixed payout table are still unavailable. The risk descriptions below are planning assessments based on exposure and the steps involved.
| Place or activity | How to locate it | Return to measure | Preparation | Risk to assess | Related guide |
|---|---|---|---|---|---|
| Bank services | Looty Bay Bank | Cash successfully protected after laundering | Civilian bank visit and a base Laundering Desk | Cash carried before protection | Banking |
| Bank vault target | Scout the bank target in your session | Actual valuables sold minus costs | Inspect the required interaction, equipment and access items | High exposure during a valuable robbery | Bank vault guide |
| Jewelry shops and stores | Identify shops while scouting the city | Actual haul and completed sale | Mask, appropriate equipment and a checked exit | Staff alarms, patrols and other criminals | Heists |
| Fence van | Dollar-sign van marker in Looty Bay or Sales Center | Cash collected from your sale | Goods to sell and room to leave promptly | Players watching the selling point | Selling valuables |
| Cargo or shipments | Follow the current session’s available cargo opportunities | Sale or production return after transport costs | Suitable vehicle and a destination for the shipment | Loading, driving and handling time | Money routes |
| Warehouses at a base | Your own built storage facilities | Goods retained for later use | An owned base and security preparation | A raid while goods are stored | Storage |
Checked November 19, 2026: Looty Bay Bank services and fence van map marker. Target-specific keys and loot are unverified.
Keep the final sale amount, replacement equipment cost and total trip length. Those three observations are enough to start comparing activities without assuming that one bank visit or cargo pickup always pays the same amount.
Bank, police station and places to store goods
The Looty Bay Police Station is the place to check for available police positions. The bank serves civilian account setup. Your base provides storage and a place to operate a Laundering Desk. Lenny’s storage is limited to cash according to the current help article. These different services make useful destinations when planning the end of a run.
Treat a base’s security as part of your storage plan. Owners can be raided, and selling locations can attract waiting players. Kefir’s November FAQ confirms that drop-off camping remains part of the game. Inspect an approach and an alternative before arriving with the goods you most want to keep. Use the base defense guide when preparing storage for a longer session.
Three routes to plan in your own session
A first store run
Enter Looty Bay and scout a small store before putting on a mask. Bring only equipment you can replace, identify the staff and inspect a route back to your vehicle. Choose a visible city exit before starting. After collecting the haul, follow the streets you already inspected, reassess traffic and leave the city. Record the exit you actually used so the route becomes repeatable for you.
A selling run
Begin with goods ready to sell and locate a dollar-sign van marker. Check the approach and an alternative selling point before driving in. Bring the equipment needed for the journey and avoid adding unrelated purchases to the run. Make the sale, collect the cash immediately and leave by the approach you found clear. Choose storage or laundering as your next destination according to the cash and facilities you have.
A base supply run
Start from your base with a destination for the cargo you intend to collect. Check vehicle suitability and storage space before leaving. Inspect the loading area, pick an accessible return route and finish by placing the shipment or goods where you intend to use them. Allow time to review security afterward. This route is useful when your next upgrade depends on keeping materials through several activities.
Compare routes using completed sessions
Use the money route comparison tool to enter income, costs and elapsed minutes. Include empty trips, loading time, waiting and failed attempts. Compare several sessions on the same server before calling one area your fastest early-game route. A route that is convenient with teammates can take longer when you handle driving, scouting and carrying alone.
Check the server schedule and wipe timer before committing to a long base project. If a friend is on a different server, follow the server-change guide before planning a shared route. The map gives you destinations to investigate, while your current server and equipment determine the route you can complete today.
Quick answers
How big is the robrun map?
Kefir shows Looty Bay and a shared global map with desert districts. A verified city area in square kilometres is unavailable in the sources checked on November 17, 2026.
Does ROB RUN have a minimap?
The official material confirms a global map and map markers for destinations and fence vans. The current minimap controls should be checked in your installed game.
How do I mark a destination?
Use the destination controls shown on your current map. The official artwork shows Home, Sales Center, Hub and Looty Bay. A universal waypoint hotkey has not been verified.
Are there mission points on the map?
Follow your active objective in the game and match its destination to the map. This guide identifies confirmed destination types and keeps changing objective markers out of the permanent location list.
Sources & updates
Last updated:
- ROB RUN Global Map, September 24, 2026 — Kefir
- How do I pull off heists in Looty Bay? — Kefir
- How do I sell my loot? — Kefir
- Where should I stash stolen loot? — Kefir
- How do I open a bank account and why launder money? — Kefir
- How do I become a cop? — Kefir
- Gameplay Overview and November 13 FAQ — Kefir Steam announcements
Official screenshots and gameplay clips © Kefir, from the Steam store. Early Access details may change with updates.